

Exceptional Gaming Experience with the Acer Predator Orion N5000: Budget-Friendly Powerhouse
Surgical Intervention May Be Necessary for Certain Types of Eye Injuries to Preserve Vision and Prevent Further Damage
There seems to be an ever flowing stream of Raspberry Pi 5 cases since the launch of our favorite Raspberry Pi back in October 2023. This new case, from Sunfounder is the $79 Pironman 5, and while we can throw many super hero puns in your face, this case is in fact MARVELous but it does have its flaws.
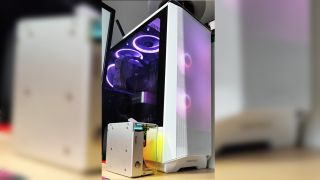
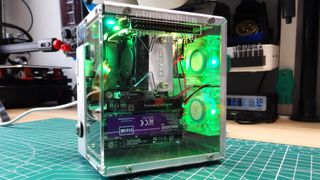
Looking like a tiny gaming PC, Pironman 5 channels that vibe into a cleverly thought out case that brings plenty of cooling, NVMe storage, GPIO access and RGB LEDs to the party.
How does it perform? Let’s find out!
Pironman 5… Assemble

(Image credit: Tom’s Hardware)
The aluminum and acrylic case looks just like a tiny gaming PC, even down to the RGB LEDs. But assembly is a much different affair compared to thebest PC cases . The case comes in two main sections. The main section is where we connect the Raspberry Pi 5 and the NVMe SSD breakout board. The other section is where the two RGB fans are located.
LATEST VIDEOS FROM tomshardware Tom’s Hardware
Image 1 of 6


(Image credit: Tom’s Hardware)
(Image credit: Tom’s Hardware)

(Image credit: Tom’s Hardware)
 Power Tools add-on for Google Sheets, Lifetime subscription
(Image credit: Tom’s Hardware)
(Image credit: Tom’s Hardware)
 Any DRM Removal for Win:Remove DRM from Adobe, Kindle, Sony eReader, Kobo, etc, read your ebooks anywhere.
(Image credit: Tom’s Hardware)
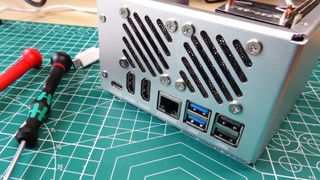
Assembly is involved, but not difficult. Get a drink, your tools and read the assembly guide before lifting the screwdriver. We mixed up the plethora of M2.5 standoffs and wondered why the HDMI and power ports weren’t aligned on our partially built unit. Yeah, the 5mm and 6mm standoffs are very easy to mix up.
After confirming the height of our standoffs (thankfully made easy with our digital calipers) and removing most of our hard work we correctly assembled the case. The assembly process needs nothing more than a PH0 screwdriver (included) but an M2.5 bit driver helped tighten up the standoffs.
(Image credit: Tom’s Hardware)
There are four custom boards inside the case. The first that we came across was for the HDMI and power ports. This board as an interposer, but it thankfully breaks out both micro HDMI ports to full size HDMI! USB C is also broken out to the rear of the case.
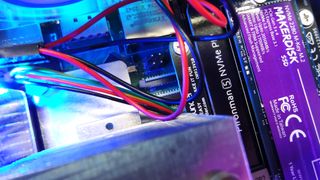
We will say that this is the one part of the build which felt flimsy. The HDMI and USB C ports feel “wobbly” and we were careful not to exert too much force when using them. In the end we took the case apart and used a nut driver to secure the standoff. There was still a wobble, but nothing dramatic. The second custom board is a power switch convertor. This is secured to two brass standoffs, and uses pogo pins (spring loaded pins) that make contact with two test points on the Raspberry Pi 5’s PCB.
These test points are for the power button and here they are used to break-out the power button to the outside of the case. The metal power button (similar to anti-vandal buttons used in industrial products and “street furniture” such as crossings) is held in place using its own nut and collar. Precariously above the coin cell battery used to keep the real-time clock (RTC) powered on. The next custom board is for the NVMe SSD and this connects to two more brass standoffs, and to the power board via a plastic rivet.
We’re not sold on the rivet, but it works. You’ll need to correctly connect this board to the Raspberry Pi 5’s PCIe connection before securing it down. The fans connect to the other side of the case and are “held” in place with self-tapping screws that also go through a plastic filter. Why did we say “held”, well not all of the screws are secure in the plastic of the fans. Of the eight screws, two just spun. Not a big deal, but we’d much prefer machine screws and nuts instead of self-tapping screws.
The final custom board is an interposer for the GPIO, breaking it out of the case side via a cutout in the acrylic panel. The interposer also provides power for the fans. These fans are RGB, but are not controlled by the Pi. Instead they are typical slow color-changing LEDs, found in many Raspberry Pi projects. The board also provides data and power to a small OLED screen that is stuck to a section of the case front. When the acrylic pieces are secured to the case, one covers the screen to prevent accidental damage. The OLED screen provides our details such as our IP address, CPU, RAM and storage use and the all important temperature values.
Image 1 of 4
 Epubor Audible Converter for Win: Download and convert Audible AAXC/AA/AAX to MP3 with 100% original quality preserved.
(Image credit: Tom’s Hardware)
(Image credit: Tom’s Hardware)
(Image credit: Tom’s Hardware)

(Image credit: Tom’s Hardware)
Cooling the Raspberry Pi 5 is a cooler similar to the 52-Pi Ice-Tower, but branded “ICECUBE”. It connects to the fan power header on the Raspberry Pi 5, and secures to the board using the specific mount points also used by the official active cooler andArgon’s THRML 30 cooler. This cooler is fed cool air via the two RGB fans, and uses Raspberry Pi OS’s own profile to trigger the fan at 50 degrees Celsius.
Assembly complete, we put a 512GB Cytron Makerdisk 2280 NVMe SSD in the slot and booted into Raspberry Pi OS. We ran through the software installation process, necessary for fan control, RGB LEDs and the OLED screen. A quick reboot and we were ready for testing.
Using Pironman 5 for day to day tasks
For basic computing tasks, you are good to go. You’ll need to either run the latest Raspberry Pi OS, or update to the latest version to unlock the full performance of the PCIe interface for your NVMe SSD, in our case a Cytron Makerdisk. The latest version of Raspberry Pi OS’s firmware seems to enable PCIe Gen 3 speeds but you can easilyenable this yourself . After enabling PCIe Gen 3 we saw read speeds of 852 MB/s and write speeds of 673.6 MB/s, a little lower than previous tests with a Lexar drive, but still way faster than micro SD card speeds.
Essentially, we now have a tiny Arm powered desktop computer that looks like one of thebest PC cases has been hit by a shrink-ray. As a desktop PC look-alike, Pironman 5 works really well. All of the ports are routed to the back, leaving a clean front panel. There is a micro SD card slot on the front panel, which can be used to boot the Raspberry Pi 5 or for additional storage.
(Image credit: Tom’s Hardware)
The elephant in the room is camera access. You can add the camera / display cables, but you’ll need to factor that into your build process as once the lid is closed, there are just “a few” screws to contend with. You’ll also need to route them out of the fan path, unless the noise of flapping flat flex cables is your beat? One suggestion would be to purchase a long flat flex cable and route it between the seam of the two-part case. There is room and it keeps the cable away from all the fans.
Image 1 of 2
(Image credit: Tom’s Hardware)
(Image credit: Tom’s Hardware)
What about the GPIO? We’ve got access to all of the pins, via the interposer board. The acrylic side cover has been laser engraved with the GPIO pin references, always useful. We hooked up our test circuit and ran a Python test. Press the button and the LED turns on for 10 seconds. Easy. Connecting your favorite breakout board or HAT is electrically compatible but the changes made to how the Raspberry Pi 5 accesses the GPIO (via the RPI01 chip rather than “bit-banging”) mean that your board may not work, yet.
As this is an aluminum case with our Raspberry Pi 5 buried deep within, we tested Wi-Fi performance, and no click-bait here, the results were interesting.
We used iperf to test the network performance between our Windows 10 PC and Raspberry Pi 5 connected via Ethernet as a baseline. Obviously Ethernet is not affected by the case but it gave us a respectable 888 Mbits/s transfer rate. So how did Wi-Fi? Well, here we go.
Our office is one floor above our 5 GHz Wi-Fi router, and we saw a maximum of 490 Kbits/s. That isn’t a typo, it was really that slow. We moved Pironman 5 so that it was next to our router and repeated the test. This gave us the best performance of 88.6 Mbits/s, a tenth of the bandwidth provided by Ethernet, but many times more than what we saw in the office. For comparison, we performed the same test on a Raspberry Pi 5 with no cooling, and saw 65.7 Mbits/s in our office. So the case does interfere with Wi-Fi, but only if you are some distance from the router.
Keeping Cool with Pironman
Image 1 of 2
(Image credit: Tom’s Hardware)
 Software Update Pro - Check and update software installed on your computer.
(Image credit: Tom’s Hardware)
The Pironman 5 software runs a webserver at the host IP address, accessible via localhost or via its IP address from another PC / smartphone. This is a really useful feature that elevates Pironman 5 over other Raspberry Pi 5 cases.
From the web interface we can tweak our fans speeds, interact with performance and temperature data via a real-time graph, and we can monitor CPU, RAM and storage metrics in real time.
Clicking on Settings, and we have the obligatory dark mode, temperature unit selection, fan mode (Quiet, Balanced, Cool, Performance, Always On) and then a series of options to control the RGB LEDs present on the interposer board.
By default, the two RGB fans are set to “Cool” and this means that they trigger when the CPU reaches 60 degrees Celsius. But there are other options which can be selected via the web interface.
- Quiet: The RGB fans will activate at 70°C.
- Balanced: The RGB fans will activate at 67.5°C.
- Cool: The RGB fans will activate at 60°C.
- Performance: The RGB fans will activate at 50°C.
- Always On: The RGB fans will always be on.
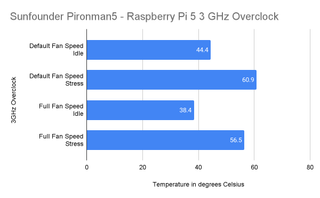
We tested the Raspberry Pi 5 idle and stress temperatures using the “cool” and “Always On” settings, for stock and for a 3 GHz overclock.
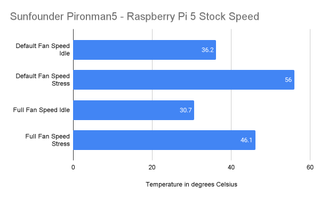
Let’s take a look at the stock temperatures for the default Cool fan setting.
(Image credit: Tom’s Hardware)
At idle the CPU is at 36.2°C, well below the trigger point for any of the three fans. Running our stress test took the CPU temperature up to 56°C, enough to trigger the CPU fan, but not the two RGB fans. Both of these temperatures are well under the thermal throttle point of 82°C.
Fan noise was negligible, as only the CPU fan came on. Repeating the test with the RGB fans running constantly, the Raspberry Pi 5 was 30.7°C at idle, 5.5°C cooler than the “Cool” setting. Under stress the CPU hit 46.1°C, 9.9°C cooler than the default cool setting. The price of this extra cooling power is that the fans are always on, but they are not obnoxious. They didn’t interfere with my day to day work.
(Image credit: Tom’s Hardware)
Can the Sunfounder Pironman 5 keep an overclocked Raspberry Pi 5 cool? The answer is yes. At 3 GHz and using the “Cool” fan setting, our Raspberry Pi 5 recorded 44.4°C at idle, 60.9°C under stress. Boosting the fans to always on and at idle the CPU temperature was a mere 38.4°C and under stress 56.5°C. Again, the fan noise was audible, but not intrusive.
How do these temperatures compare to other Raspberry Pi 5 cases? We dug out our favorite case, theArgon ONE V3 M.2 NVMe , a case that has a similar set of features. The Argon case does not have the extra fans, nor can we set them to full power, but despite that it provides a similar cooling experience to the Pironman 5. Here is a table comparing theArgon ONE V3 M.2 NVMe to the Sunfounder Pironman 5 at default fan speeds.
Swipe to scroll horizontally
| Header Cell - Column 0 | Sunfounder Pironman 5 | Argon ONE V3 M.2 NVMe | Temperature Delta |
|---|---|---|---|
| Stock Idle | 36.2°C | 33.4°C | 2.8°C |
| Stock Stress | 56°C | 53.2°C | 2.8°C |
| Overclock Idle | 30.7°C | 37.3°C | -6.6°C |
| Overclock Stress | 46.1°C | 65.3°C | -19.2°C |
| Price | $79 | $49 | Row 4 - Cell 3 |
There’s not a lot between the two cases when it comes to temperatures for stock CPU speeds, a mere 2.8°C. But when overclocked, the Pironman 5 drops the idle temperature 6.6°C below what the Argon can achieve. But a whopping 19.2°C difference sees the Pironman 5 keep the Raspberry Pi 5 frosty under a heavy load.
 PDF application, powered by AI-based OCR, for unified workflows with both digital and scanned documents.
 Who is Pironman 5 for?
It may look like a mini gaming PC but the Raspberry Pi 5 is not built for triple-A games. So what can we do with the Pironman 5 and our Pi? As a desktop PC, Pironman 5 looks the part and we’d totally be happy with this setup for an office PC or for our kids to learn with.
If you are keen to push your Raspberry Pi 5 to the max, then the great cooling on offer means that the Pironman 5 will do the job. With NVMe on offer we have fast and plentiful storage, so the Pironman 5 could be a compact file server hidden in your home.
Bottom Line
(Image credit: Tom’s Hardware)
For $79, Sunfounder’s Pironman 5 is a great case with only a handful of faults. GPIO access is decent but HAT access may become an issue, one day. Camera / Display port access is awkward, and considering that the Raspberry Pi camera module 3 is a natural purchase for most, they’ll need to plan ahead. The assembly process is involved, and you will make a mistake, but it was no means frustrating.
This is a great case that gives us desktop PC vibes for our favorite single board computer. The $79 price tag may choke some, but if you need great cooling but need to save some cash, get theArgon ONE v3 M.2 NVMe .
Also read:
- [New] 2024 Approved ClearShot Vision Screen Recap
- [New] 2024 Approved The Playlist Pivot New Order Strategies for YouTube
- [New] In 2024, Boundless Video Recorder App
- [New] Navigating High Dynamic Range Photography with PS
- [Updated] Music Maestro Uploading Beats to Your YouTube for 2024
- 2024 Approved State-of-the-Art Devices for Online Live Shows
- 2024 Approved Unveil the Potential of VFX Animated Text for Free
- 2024 Approved Zooming Into Success Mastering Online Presentations
- 3 Effective Ways to Unlock iCloud Account Without Password From iPhone 12
- Actors' Agreement for Public Viewing for 2024
- Approach:
- Approach: Consider the Role of Local Regulations in Determining Land Use.
- Comprehensive Computer Tech Evaluations by Tom's Hardware Experts
- Comprehensive Evaluation of Brainiac's Raspberry Pi Smart Kit
- Discover Cutting-Edge Devices on Tom's Hardware Hub: Top Product Reviews and Tips
- Dive Into Technology Insights and Reviews at Tom's Hardware Hub
- Does Life360 Notify When You Log Out On Sony Xperia 10 V? | Dr.fone
- Expert Hardware Advice From Tom
- High-End Gaming Monitor Showdown: The Titan Army P27A2R 180Hz Review
- How Can I Catch the Regional Pokémon without Traveling On Realme 11 5G | Dr.fone
- How Does The Asus ROG Azoth Extreme Hold Up? In-Depth Review for 500 Dollar Buyers
- How to Fix Locked Apple ID from Apple iPhone 12
- In 2024, Detailed guide of ispoofer for pogo installation On Itel A70 | Dr.fone
- In 2024, Twitch Broadcast Excellence The Ultimate 5 Guide
- In-Depth Analysis of the Acer Predator Orion 5000: Unbeatable Performance Meets Cost-Efficiency
- In-Depth Analysis: Sabrent's 1TB Rocket Nano SSD (M.2 2242) - Setting the Benchmark in Miniaturized Memory Drives
- In-Depth Gigabyte B76ve DS3H AX Motherboard Analysis: Affordable Micro ATX for Multi-Display Setups
- In-Depth Review of the Fastest Storage Devices: Lexar SL500 and SL600, Delivering Up to 20 Gbps Bandwidth
- Inside Look at Cutting-Edge Devices - Guided by Tom's Expertise
- Inside Tom’s Workshop: Your Go-To Source for Hardware Insight
- Insightful Breakdown of Technology at Tom's Hardware Blog
- Is Fake GPS Location Spoofer a Good Choice On Vivo Y100? | Dr.fone
- M1 Demystified Apple Redefines Chipset Technology
- Navigating New Tech Frontiers: Tom's Hardware Evaluations and Reviews
- Navigating Technology Trends at Tom's Computer Resource
- Navigating the World of PC Building with Tom's Hardware
- Pivoting with Purpose Rotate and Rethink with YouTube's Latest Tools for 2024
- Solving Connectivity Problems: A Guide to Restoring Wi-Fi on Your Surface Pro
- Speedy Assembly for Stunning Google Image Mosaics
- The Dangers of Automated AI Systems in Producing Legitimate Windows 11 License Codes
- The Ultimate Guide to the Newly Updated Dell XPS 13 - Where Style Meets Speed with Snapdragon X Elite Tech
- The Ultimate Travel Wi-Fi Companion: Asus RT-AX57 Go Review - Navigating Seamless Connectivity Anywhere
- Tom's Computer Hardware Reviews & Guides
- Tom's Hardware Review: Comprehensive Guide and Insights
- Tom's Tech Reviews: Comprehensive Guide
- Unveiling Efficiency: A Closer Look at NZXT's C1500 Platinum PSU
- Unveiling the Potential: In-Depth Review of HighPoint's Rocket 1608A Card - Upgraded Storage, Superior Power
- Title: Exceptional Gaming Experience with the Acer Predator Orion N5000: Budget-Friendly Powerhouse
- Author: Kevin
- Created at : 2024-08-18 12:08:33
- Updated at : 2024-08-19 12:08:33
- Link: https://hardware-reviews.techidaily.com/exceptional-gaming-experience-with-the-acer-predator-orion-n5000-budget-friendly-powerhouse/
- License: This work is licensed under CC BY-NC-SA 4.0.